
The BILL approval process allows for multiple people within an organization to confirm that bills are accurate, legitimate, and authorized for payment.
Navigate to the Approvals Screen
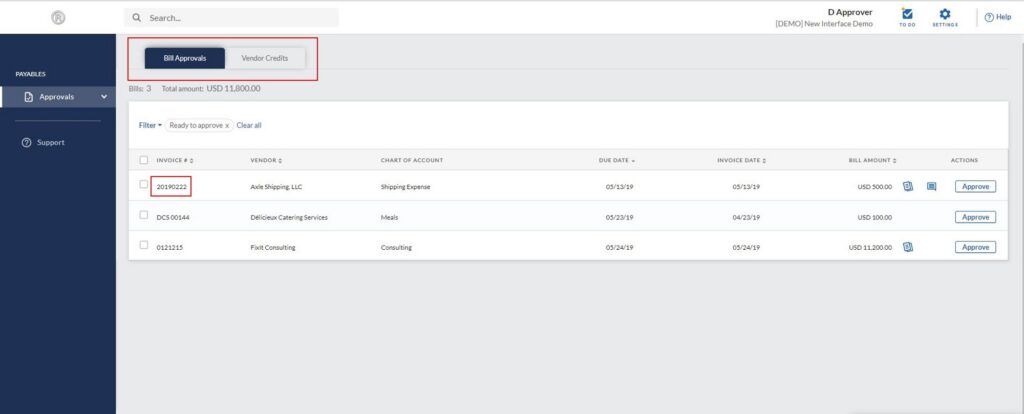
When BILL users with the “Approver” permission log in, they are taken to the Approvals screen. Users with greater permissions click the Approvals link in the left navigation menu to open this screen.
The Approvals screen shows two tabs at the top. The Bill Approvals tab (default) displays a list of bills awaiting the user’s approval. There may be other bills assigned to the user that are not showing in the list. This happens when the approver ahead has not yet approved the bill.
Reviewing a Bill
Click on the top Invoice # to view the first bill’s document and transaction information in your queue.
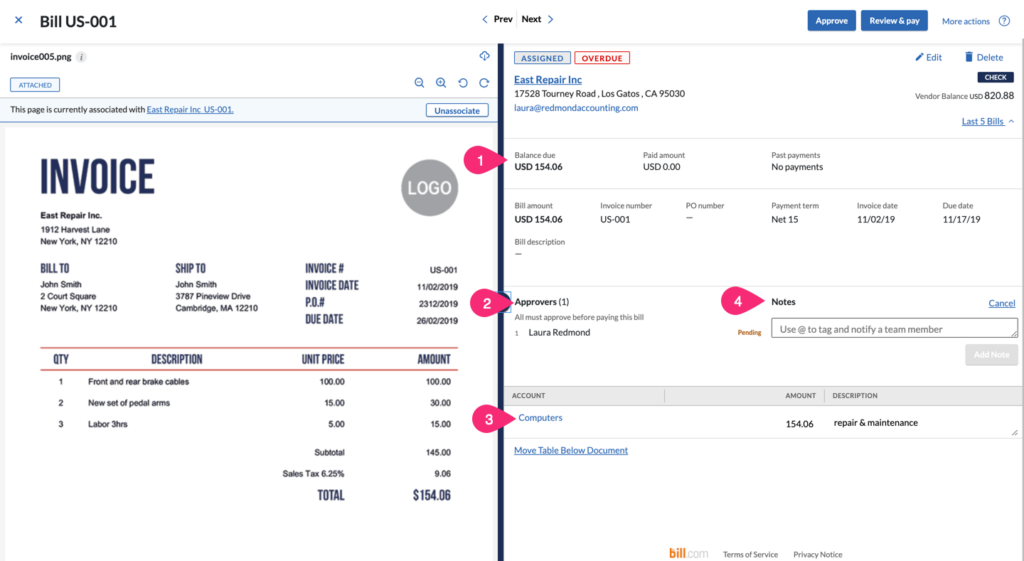
On the left-side panel, review the bill document received from the vendor.
In the right-side panel, review the transaction information recorded in the general ledger for this bill. In the middle section of the right-side panel, review previous approver activity and future approvers in the line behind you. On the right-side panel’s bottom section, review the coding for this bill – account, class, job, etc. Confirm that all the information is accurate and that the bill is legitimate. If you have the appropriate permissions, you may be able to edit the bill to make any necessary changes or add additional details to the transaction.
In the Notes section in the middle of the right-side panel, read and/or add any relevant notes as needed. New notes will be seen by subsequent approvers and the payer. To tag another user in the note, type the @ sign followed directly by the username of the BILL user. This will send that user an email to call greater attention to the note.
Approve, Deny, or Skip a Bill
To approve the bill, click the Approve button in the upper right corner. The next approver in line can now review and approve this bill. If you are the final approver in line, then your approval releases the bill for payment. If the bill is already marked PAID, it cannot be paid again, but you should still approve it to mark it retroactively.
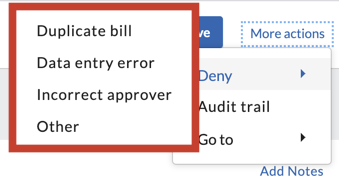
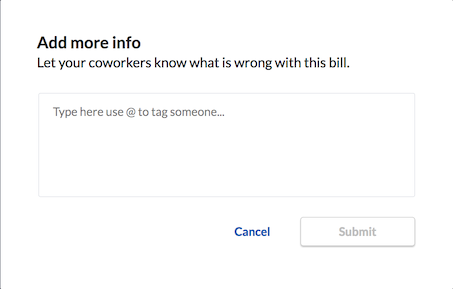
To deny the bill, click the More actions link and then click Deny and then one of the 4 Deny options: Duplicate bill, Data entry error, Incorrect approver, or Other. Enter a note to explain to the bill creator why the bill was not approved. Perhaps you want the information in the Bill Details side panel (such as coding or amount) to be changed before you approve. Or perhaps you would like someone else in your organization to approve the bill before or instead of you. The bill creator will be notified that the bill needs review and will see your note.
To skip the bill, click the Prev or Next arrows at the top & middle of the screen to move to the next bill in your queue. This lets you move through your approval queue in a slideshow manner. You may have a question about the bill and want to contact the vendor before you approve it. Or you may post a note for another BILL user in your organization to answer before you approve.
Alternatively, you may click the X in the upper left corner to close the bill and return to the list of bills awaiting your approval. From this list, you may check the box and approve one or more bills without review.

Leave a Reply